
मशीनें जो किसी सामग्री के आकार को कम करती हैं, पीसने वाले तत्वों को भी नष्ट कर देती हैं. सामान्य तौर पर, जितनी अधिक कठोर सामग्री आप पीसते हैं,, उतनी ही जल्दी आंतरिक भागों का घिसाव होता है। यह सुनिश्चित करने के लिए कि आपका हैमर मिल कुशलतापूर्वक कार्य करे और लंबे समय तक चले,, इसके पहनने वाले हिस्सों का नियमित निरीक्षण और समय पर उनका प्रतिस्थापन करना अत्यंत महत्वपूर्ण है।
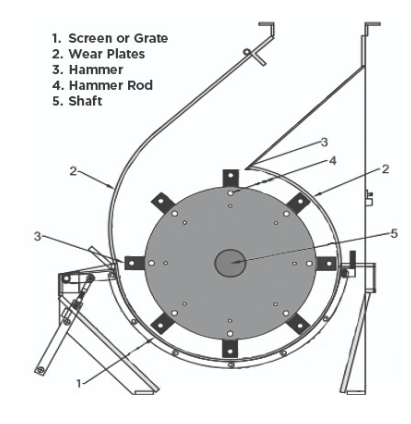
इन घटकों में हथौड़े शामिल हैं, रॉड्स,, स्क्रीन, बीयरिंग, और प्लेटें पहनते हैं. इस गाइड में, हम आपको अपने स्क्रीन या ग्रेट्स को बदलने के चरणों के माध्यम से मार्गदर्शन करेंगे ताकि आपका हैमर मिल कुशलतापूर्वक काम करता रहे।.
स्क्रीन या ग्रेट्स को बदलना
सूचना: इस प्रक्रिया को दो लोगों द्वारा किया जाना चाहिए। 10.
- मुख्य पावर सप्लाई ब्रेकर को बंद करें।.
- मुख्य स्विच को अपनी साइट की OSHA- अनुमोदित लॉकआउट/टैगआउट प्रक्रिया का उपयोग करके सुरक्षित करें।.
- मिल हुड खोलें.
- रियर स्क्रीन को बाहर निकालने के लिए हैंडल का उपयोग करें।
- पीछे की स्क्रीन से हैंडल निकालें ताकि आप इसे नई स्क्रीन से जोड़ सकें.
- फ्रंट कवर प्लेट को अनबोल्ट करें.
- फ्रंट स्क्रीन के लिए बोल्ट को अनफास्ट.
- फ्रंट स्क्रीन निकालें.
- नई स्क्रीन डालें और इसे जितना संभव हो उतना आगे बढ़ाएं ताकि दूसरा ऑपरेटर उस तक पहुंच सके.
- मिल के सामने, दूसरा ऑपरेटर स्क्रीन को ऊपर की ओर खींचता है और फिक्सिंग कोणों को जगह में बोल्ट करता है.
- फ्रंट कवर प्लेट को बदलें.
- बोल्ट को जकड़ें.
- नई रियर स्क्रीन पर हैंडल को जकड़ें.
- रियर स्क्रीन रखें.
- सुनिश्चित करें कि फ्रंट स्क्रीन की फिंगर प्लेट्स रियर स्क्रीन की फिंगर प्लेट्स के साथ जाली हैं.
- मिल हुड बंद करें.